Homemade Butter Naan Garlic without Yeast How to Prepare

         Hi friends, today one interesting dinner item.. Butter Naan Garlic restaurant style.. Sharing today, one of my favorite Indian Bread, Garlic Butter Naan which is easy to cook, and don't need yeast or lengthy fermentation time. In India, everyone still don't feel comfortable using yeast in everyday cooking. Few of my friends even asked me to post a no-yeast method... So for anyone looking for a quick and easy everyday Garlic Naan Bread, I thought it would be good to share a recipe that needs no yeast..But time will be taken for resting time. Actually we went restaurant I compulsory order Butter Garlic Naan with Paneer butter masala gravy... But I don't no how to prepare in home... In your city we don't need yeast so how can I prepare... Then I search in online, first time I saw with out yeast I really impress... But small doubt, no need yeast but the taste?????? K first I tried this how it came.. Really guys it wonderful taste... So simple ingredients taste is wow.. You must enjoy the taste.. Not only yeast with out tandoor.. We prepare this in iron pan tawa.... to make Naan..This recipe also comes with a little personal touch... 
Homemade Butter Naan Garlic

Ingredients :-

  • Flour (Maida) 2 cups
  • Milk 1/4 cup
  • Salt to taste
  • Baking Powder 1/2 tsp
  • Curd 4 tbsp
  • Oil 6 tbsp
  • Butter 3 tbsp
  • Garlic pieces
  • Coriander leafs
Preparation :-


  1. First take a plate add flour, salt, oil, curd and mix it.. Now take a bowl add lite warm milk, baking powder add and mix it well for... And sock it for 10 minutes..... After 10 minutes add to flour and make soft dough......
  2. And make soft dough, and then close it with plastic cover for 3 to 4 hours sock it for.......
  3. After 4 hours open cover, and then mix it well for 5 minutes...  
  4. After 5 minutes, make small balls and make naans........
  5. Now take iron tawa to heat it for high........ Now apply water to naan...
  6. Fry it for 1/2 minute it will be came small bubbles, and then turn it like this again fry it for 1/2 minute more.......
  7. Another side fried then again put it stove and then turn it another side....... then move it to a plate......
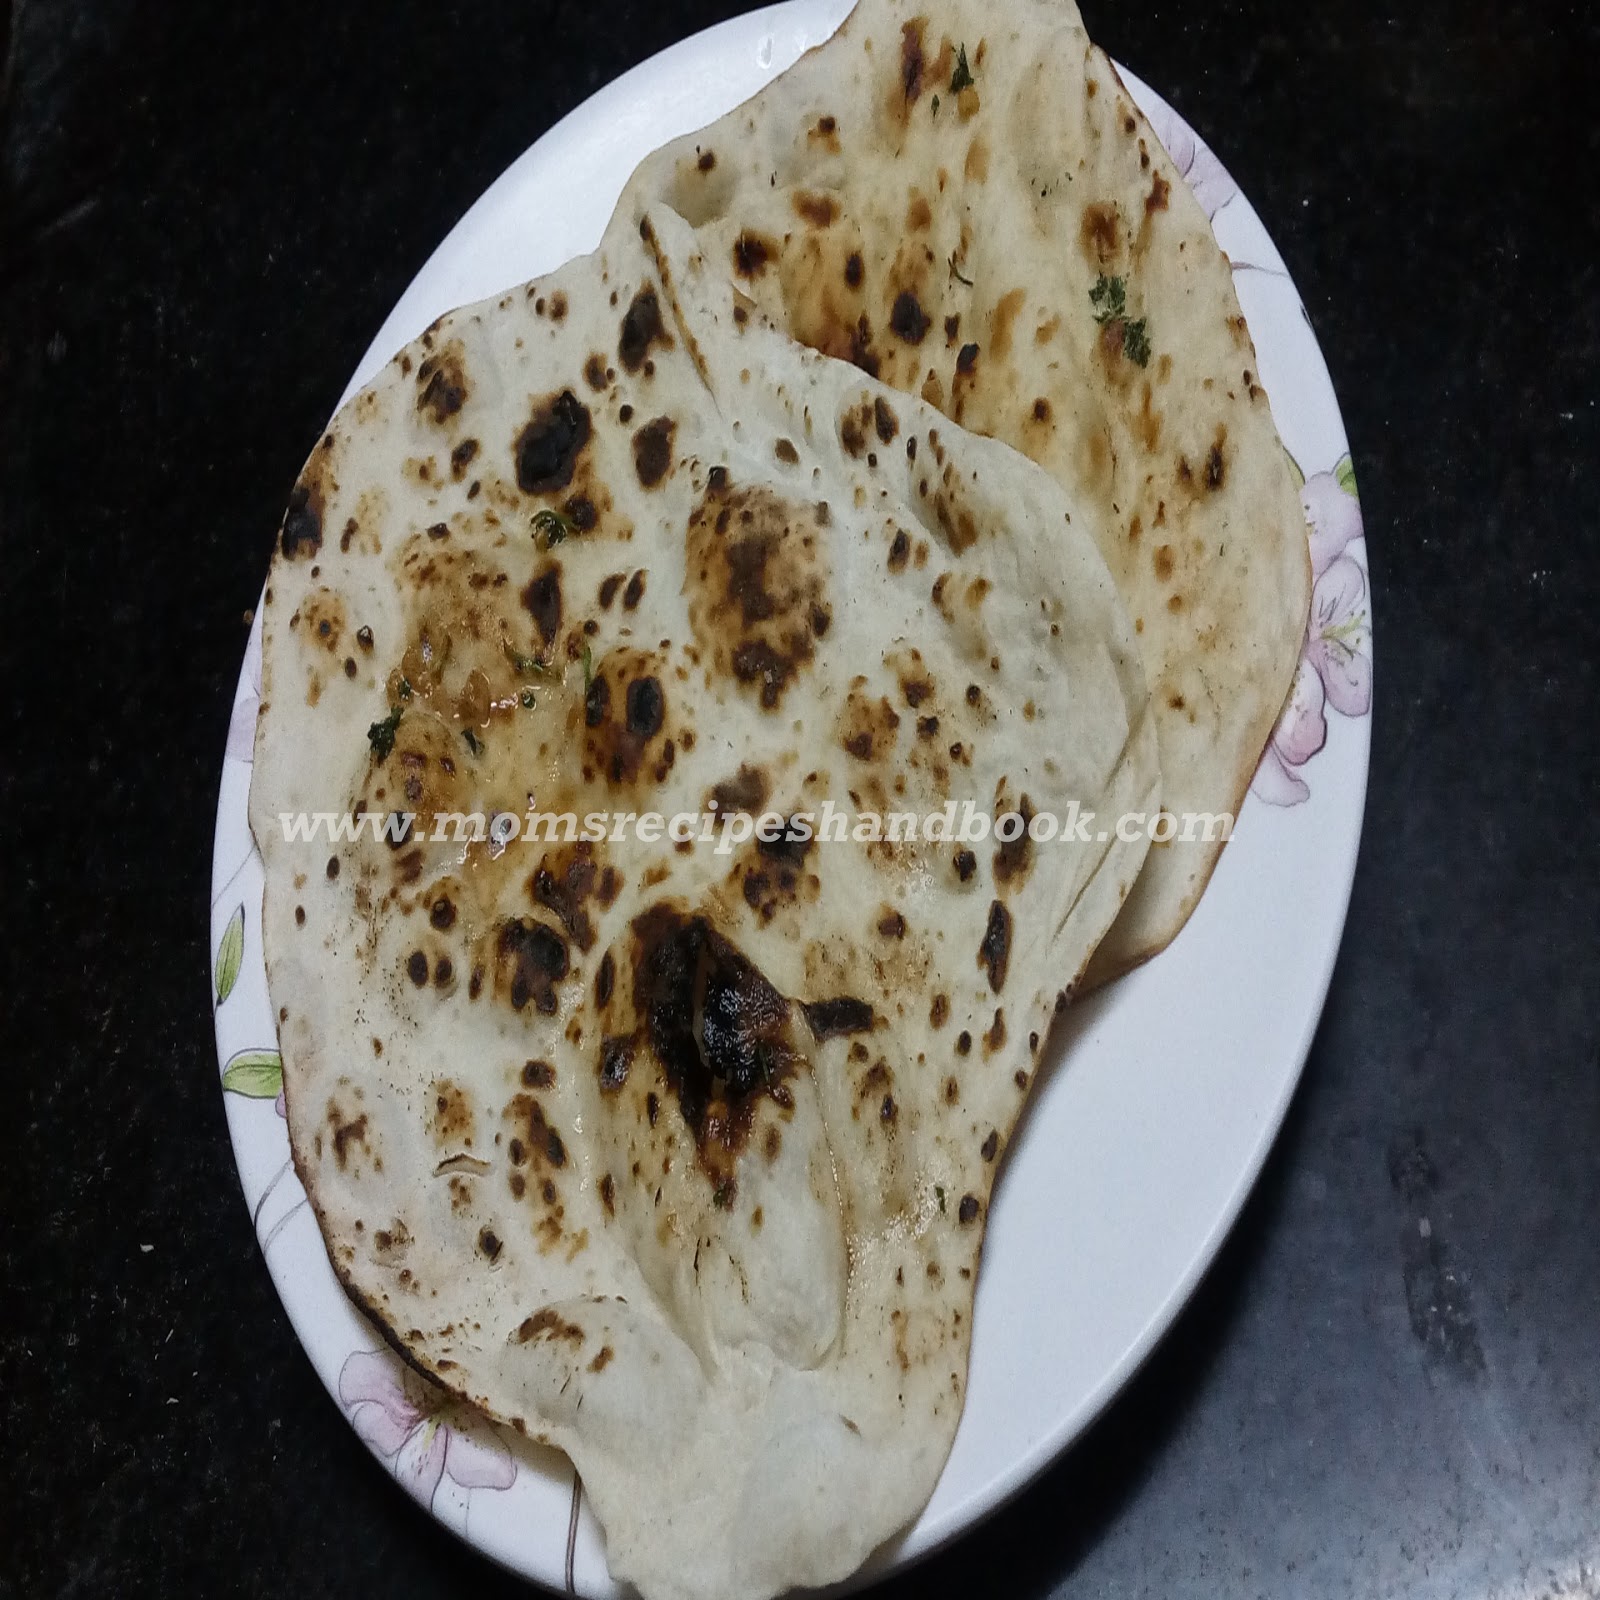
  8. Now take a wok add butter to melt, then add garlic chopped pieces, some coriander chopped leaves to fry.....
  9. And then apply to naan both sides and then serve it hot.........

Now so tasty and delicious dinner item Garlic Butter Naan....... It's my favorite item, its so good combination is butter paneer masala / palak paneer, cashew butter masala its so good combination item.... So friends try this Naan in your home and enjoy this.........  Love you all Yours Neha Satish........, Pls give me your valuable feed back to me....... :)

Rayalaseema Ragi Sankati Recipe How to Prepare

            Hi friends, today recipe is Ragi Sankati Rayalaseema Special item... After marriage my sister went to Kadapa.. (Rayalaseema).. One day we went to kapada..  There my sister mother-in-law prepare this taste Ragi Sankati... to me and my family.. Wow its very tasty and delicious.. But that day she will prepare in this Ragi Sankati combination is mutton korma... But am not eat mutton I love only chicken, fish, prawns, etc.., but am not eat mutton.. mmhhhh!!!!!!! How can  eat this.. My sister told to me its so good u must eat this.. Ok then I will eat, but only gravy not pieces.. she told yes... First time  I will eat this wow amazing guys... Its so spicy and so delicious......... Not only for mutton, some different taste to eat with chicken and fish curry also its so delicious......... Today I will serve this with Chicken korma.....  But that was the traditional way of making Ragi Mudde. Ragi Sangati is one of those few dishes that gets done very frequently at home. So naturally I had to come up with a short cut way of making this traditional dish quick and fast. Ever since finding this method of making Ragi Mudde in pressure cooker, I have never looked back. I thought I will share this method with each step as I found this method to be the most simplest way of making the mudda quickly. There are certain conditions in making this Finger Millet balls in the right way. First, it got to have more Ragi flour than rice and it got to be soft yet not sticky. I found I was not hitting the right spot at times in the old method. But if you follow the pressure cooker method, you are sure to get the right consistency. Lets see the process to make step by step pics.......

Ingredients :-

  • Rice 1/2 cup
  • Ragi flour 1 cup
  • Salt to taste
  • Water 4 to 5 cups
Preparation :-

  1. First take a cooker add cleaned rice, salt to taste, water 4 cups and then close it with lid and boil it for 5 to 6 vissels..... After 6 vissels switch off the gas and put it a side for cool..
  2. After cooker is cool then open lid, and then mix it well for with help of wooden stick... And mash it well for.....
  3. Then add little bit water again mash it.. And now add ragi flour also again mix it well for... It will be little tight then add some little more water again mash it.. (Some people like to eat tight/ some people like soft.. today i will share soft.. If you want tight dont add water now.. then it will be tight and make ball)....
  4. And then move it to gas again boil it for 1 more minute and then move it to a side......
And now so delicious tasty recipe Ragi Sankati is ready to serve.... you can serve this Ragi Sankati with curd also so tasty........ In this summer eat this Ragi regularly it so good to health.. I will share so more Ragi recipe for you guys........ Serve it with Chicken Korma curry..... :)  Try this Sunday recipe...... Yours Neha Satish...

Chicken Korma Recipe Andhra Style How to Prepare

       Hi friends, today one different recipe Chicken Korma...... This recipe is my amma's cuisine special recipe.. So friends try this simple recipe... Here is the recipe details step by step pics.....

Ingredients :-

  • Chicken 500 gm
  • Onions 2 medium
  • Fresh coconut 1/2 cup
  • Tomatoes 3 medium
  • Garlic cloves 10 nos
  • Ginger pieces 10 nos
  • Turmeric powder 1/2 tsp
  • Red chilli powder 4 tbsp
  • Salt to taste 
  • Oil 10 tbsp
  • Garam masala powder 1 tsp
  • Coriander powder 1/2 tsp
  • Curry leaves and Coriander leaves
Preparation :-

  1. First take a bowl add oil 3 tbsp to heat, when oil is heated then add chopped chicken, salt, turmeric powder 1/4 tsp mix it well. Then add red chilli powder 2 tbsp mix it well.
  2. Now close with lid cock it for 10 min in low flame. After 10 min open the lid and mix it well. (when chicken is boiled oil will oozes out now chicken is ready) When chicken is boiled then move it to a bowl.
  3. In same bowl add oil to heat, then add chopped onions, salt to taste, turmeric powder and fry for 2 mins in medium flame. After 2 mins add chopped tomatoes mix it well.
  4. Close it with lid boil it for 3 more mins, after 3 mins open the lid mix it well. (when tomatoes are finely cooked then add another ingredients).
  5. Now take a jar add fresh coconut pieces, ginger garlic pieces and grained it fine paste.
  6. Add grained coconut paste to fried tomatoes and mix it, then add curry leaves again mix it.
  7. When oil oozes out, then add boiled chicken, red chilli powder again mix it and close it with lid........ Cook it for 5 min in low flame.
  8. Now open the lid and mix it then oil oozes out, then add 2 glasses of water and mix it close it with lid one boil it.
  9. After 10 mins open the lid, add garam masala powder, coriander powder and mix it well then add chopped coriander leaves. Boil it for one min then move to serving bowl.
So friends try this recipe in your home and share it serve it... You can serve this hot steam rice / plain biryani........ Try this and then say to me how's the taste tell me your valuable messages... Keep smiling love you all your's Neha Satish......... :)

Thotakura Coconut And Peanut Fry Recipe

       Hi friends good after noon....... Today one Andhra style recipe Thotakura fry with Coconut and peanut fry... In your Andhra we have so much leafy vegges here.. So almost every one prepare these leafy vegges make add to pappu (Dal), fry, and also prepare tomato leafy curry (Pulla kura).. I almost prepare this leafy vegges regularly in my home.. I like to prepare  dal leafy curry... But today I will try this coconut and peanut its so good to eat this amaranth leaves... So easy preparation and so fast to cook this tasty fry.... Lets see the process to make this curry... See step by step pics.......
Thotakura Coconut And Peanut Fry Recipe How to Prepare

Ingredients :-

  • Amaranth (thotakura) 2 cups
  • Peanuts 3 tbsp
  • Dry Coconut medium pieces 
  • Onions 2
  • Salt to taste
  • Turmeric powder 1/4 tsp
  • Red chilli powder 1 tsp
  • Red chillies 2
  • Oil 7 tbsp
  • Mustard seeds 1 tsp
  • Urad dal 1 tsp
  • Cumin seeds 1 tsp
  • Garlic cloves 4
  • Curry leaves
    Thotakura Coconut And Peanut Fry Recipe How to Make
Preparation :-

  1. First take a wok add oil to heat, when oil is heated then add urad dal, mustard seeds, cumin seeds to fry. Then add curry leaves red chilli pieces to fry.
  2. Now add chopped onions mix it well for. Then add Chopped thotakura leaves and then mix it well for.....
    Thotakura Coconut And Peanut Fry Recipe How to Cook
  3. Then close it with lid and boil it in slow flame for 5 to 8 minutes.... After 5 minutes open the lid mix it well for...
  4. Now add salt, turmeric powder and then mix it well for again close it with lid and boil it for water will be vapor...
    Thotakura Coconut And Peanut Fry Recipe How to Make
  5. Take a jar add peanuts, coconut pieces, red chilli powder and then grind it fine powder..
  6. After 5 minutes ope the lid mix it, water will vapor then add grind coconut powder and then mix it well for......
  7. Fry it leaves raw smell.. It will be dried then move it to a serving bowl.......
    Thotakura Coconut And Peanut Fry
So tasty and delicious recipe Thotakura Coconut peanut fry recipe is ready to serve.... Its good to eat with hot steam rice and also serve with roti and chapati good combination..... So friends try this simple and tasty recipe in your home share it and eat it.. Then send me a small feed back to me....... :) yours Neha Satish...
Thotakura Coconut And Peanut Fry


sorakaya halwa sweet recipe how to make

          Hi friends happy sunday :)... Today one sweet recipe Sorakaya Halwa (Bottle gourd Halwa). In my home I like to eat sweets, but my husband like's hot and spicy... So I prepare almost to my husband hot only.. Off course I prepare both sweet and hot ha ha ha.. Actually I prepare halwa's regularly in my home, like carrot halwa, beet root halwa, vermicelli halwa, suji halawa etc..., You I don't like sorakaya (bottle gourd) but my amma prepare this veg in my home monthly 3 times.. like she prepare sorakaya fry, sorakaya pappu, sorakaya curry like so much types... That day I am not eat :), but my amma not accepted so mmmmmhhhhhh... But one day my amma prepare this halwa to me.. she will not told me this sorakaya, after I completed this amma told me that is sorakaya that day onward's am fan of this Sorakaya.... So friends today I will share another my amma cousin recipe. Here is is the details...
Ingredients :-

  • Sorakaya grated 1 cup
  • Sugar 1 cup
  • Milk made 1/2 cup
  • Cardamoms powder 1 tsp
  • Ghee 15 tbsp
  • Milk 1 cup
  • Almonds (all dry fruits)
Preparation :-

  1. First take a wok add ghee to heat, then add almonds to fry, after fry move it to a side. 
  2. Now in same wok add grated bottle gourd and then fry it for leaves raw smell... 
  3. Bottle gourd fried, then add milk mix it well for.. And boil it for 10 minutes in low flame.
  4. Then add sugar again mix it well for.. And cook it for sugar is melted it came halwa consistency... 
  5. Now add milk made again mix it well for..... Cook it for 5 more minutes and then move it to a serving bowl and then serve it.......  
So tasty and sweet recipe Sorakaya (bottle gourd) halwa is ready to eat.. You can serve this hot are cool its prefect.... So friends try this simple sweet item in your home and then send to me a small feed back to me..... :) yours Neha Satish.........

Brinjal Tomato with Mango Recipe Andhra Style How to Prepare

          Hi friends, today one desi recipe Vankaya Tomato with Mamidi kaya Kura (Brinjal Tomato with Mango Curry) recipe.  This curry is my grand mother recipe, my grand mother prepare all vegges prepare pulusulu (gravy type) she prepare almost prepare with lady's finger, brinjal, drumstick, yam (kandha gadaha), taro (chamadumpa) etc.., My grand mother prepare gravy, she will use in that lightly sugar added for spicy sour and little bit sweet.. When we go to my grand mother home my school holiday's.. She will so many old recipe to me and my sister we are enjoyed lot in my grand mother home.. Not not only gravy she will prepare chutneys, old sweet items.. When we go to my grand mother home she will definitely prepare sweet to me.. That is coconut laddu, rice flour halwa prepare for me guys.. Really its amazing to me off course my grand mother love's a lot.... ha ha ha... Ok lets move to curry.. Actually my my mother also prepare but not regularly.. but my grand mother will be prepare all week days... This also one of my favorite recipe.. So today I share my grand mother recipe for my sweet viewers.. I know Andhra people know this recipe.. Simple ingredients and simple process.. I use in this gravy brinjal, mango, tomato and onions..... Its simple and tasty gravy, so fast recipe... Here is the recipe details.....
Brinjal Tomato with Mango Recipe Andhra Style How to Make
Ingredients :-

  • Brinjal 250 grams
  • Raw Mango 1
  • Tomatoes 3 big size
  • Onions 2
  • Turmeric powder 1/4 tsp
  • Red chilli powder 2 tbsp
  • Salt to taste
  • Oil 8 tbsp
  • Mustard seeds 1 tsp
  • Fenugreek seeds 1/4 tsp
  • Curry leaves 
Preparation :-


  1. First take a bowl add oil to heat, when oil is heated then add mustard seeds, fenugreek seeds to fry. Then add chopped onions salt, turmeric powder and then fry it for lite red color..
    Andhra Style Brinjal Tomato with Mango Recipe
  2. And now add chopped tomatoes and then mix it well for..... Boil it for tomatoes are be soft.. Then add chopped brinjal, red chilli powder and then mix it well for.. Close with lid and boil it for brinjal will be cooked....
    Brinjal Tomato with Mango Recipe Andhra Style How to Cook
  3. When brinjal is cook, then add chopped raw mango again mix it, then close it with lid and cook it for mango also boiled.....
    Brinjal Tomato with Mango Recipe Andhra Style How to Make
  4. Boil it for 5 to 10 minutes and then open lid and mix it once and then move it to a serving bowl..
    Brinjal Tomato with Mango Recipe Andhra Style How to prepare
Now the dish is ready to serve..... Its good to serve with hot steam rice... So spicy and sour delicious recipe.. So friends try this in your home and then send to me a small feed back to me........ :) Yours Neha....